

Blazor Render Modes in .NET 8
Before .NET 8, you usually ran your entire Blazor application using one of Blazor’s hosting models: WASM or Server.
- With Blazor Server, your components run on the server, and all interactions between browser and server take place via an open socket connection.
- With Blazor WASM, your entire application is sent to the browser where it runs; and all interactions with the user interface are handled directly in the browser.
.NET 8 lets you control the way your components run, by modifying what’s known as Render Mode.
Component rendering modes in .NET 8 are as follows :
- Static server-side
- Interactive server
- Interactive WASM
- Auto interactive
- Streaming
But what is it? Which one to use?
1. Static Server-Side Rendering (Static SSR)
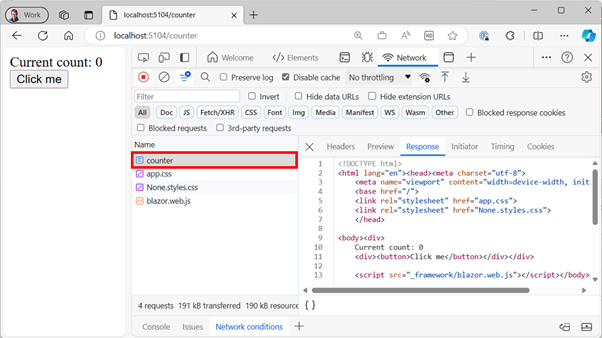
When you create a new Blazor Web App project, by choosing the “Interactive Render Mode = None “, you create a Blazor project with static rendering.
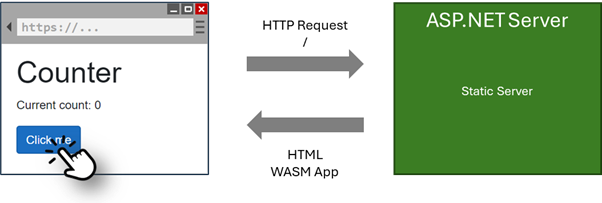
By default, components use static server-side rendering (Static SSR). The component is displayed in the response stream and interactivity is not enabled.
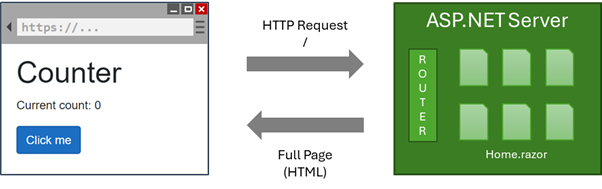
The entire requested page is sent to the client. The user who clicks on the button will not execute any code on the server. However, it is always possible to create custom JavaScript code to manage an HTML Form that will call up another page on the server.
For static rendering to work, at least two calls are required:
builder.Services.AddRazorComponents();
...
app.MapRazorComponents<App>();
Pros
Static rendering is particularly useful for sites where the display of information is essential, such as online product pages, non-interactive graphics and so on.
Server-side static rendering is simple and does not require the use of long-lived components or component states.
ASP.NET processes the incoming request, renders the component, then immediately discards it. If you’re used to building web applications using Razor Pages or MVC, using Razor components will seem very similar.
Cons
Since components are rendered statically, you can’t easily set up event handlers for DOM events, such as the user clicking a button. You can capture user data via HTML Forms, but more advanced interactivity would require one of the other modes.
2. Server Side Rendering (Interactive SSR)
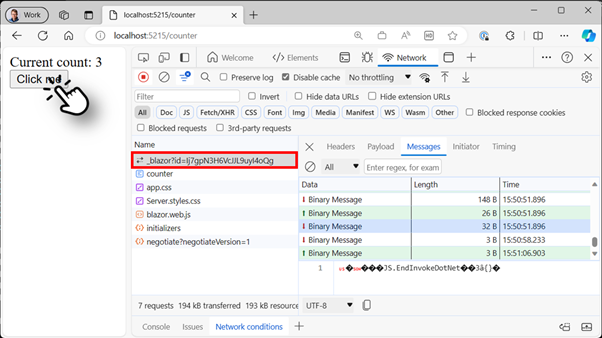
When you create a new project of type “Interactive Render Mode = Server “, you create a Blazor project whose component is generated interactively from the server. User interaction is handled via a WebSocket/SignalR connection, in real time with the browser.

On the first call, the page is sent to the client in its initial state. Each time the user clicks on the button, a WebSocket message is sent to the server, which calculates the amount of HTML code (DOM Diff) to send to the client. We can see these message exchanges in the Network tab of the web development console.
For Server rendering to be operational, it must be activated via these commands:
builder.Services.AddRazorComponents()
                .AddInteractiveServerComponents();
...
app.MapRazorComponents<App>()
   .AddInteractiveServerRenderMode();
You can also enable rendering in a single Razor component using the :
@rendermode RenderMode.InteractiveServer
But also when instantiating the component, or the whole application (via the Router):
<MyComponent @rendermode="RenderMode.InteractiveServer" />
<Routes @rendermode="RenderMode.InteractiveServer" />
Pros
Server mode is a simple way of enabling interactivity for your application.
As the component is always running on the server, there’s no need to introduce a Web API to handle requests (your components can call metrier logic or connect directly to data).
As of .NET 8, Blazor server circuits are automatically disconnected when they are no longer required. In this case, if we navigate to a different page without interactive server components, the underlying socket connection will be disconnected after a short time, reducing the load on the server.
Cons
In this mode, every interaction is sent to your server via the web socket connection, which must keep track of all “active” components. This means your server must be able to handle the load.
If the connection between browser and server is lost, an error message is displayed and the application stops working. The user will then have to reload the application.
3. WASM Rendering
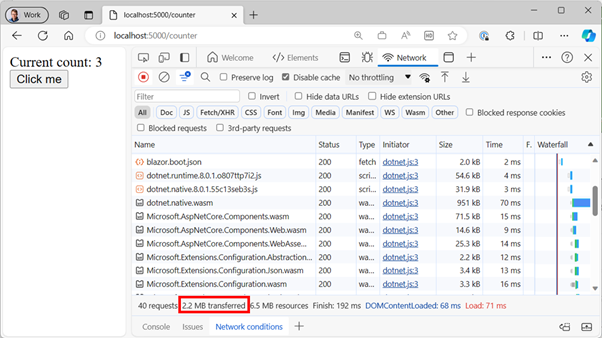
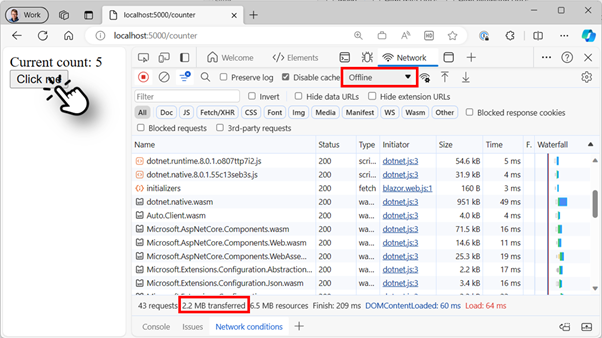
When you create a new project of type “Interactive Render Mode = WebAssembly”, you create a Blazor project that displays the component interactively on the client using Blazor WebAssembly. The .NET runtime and all libraries are downloaded and cached when the WebAssembly component is initially displayed.
When publishing a WebAssembly project, the compiler performs a Trimming process, which reduces the size of the published packages. Trimming removes all types and methods that are not used in your project.

On the first call, the page and all the (reduced) .NET libraries are sent to the client. Each time the user clicks on the button, the WASM code present on the client is executed and the HTML result is updated.
For WebAssembly rendering to work, it must be activated via these commands:
builder.Services.AddRazorComponents()
                .AddInteractiveWebAssemblyComponents ();
...
app.MapRazorComponents<App>()
   .AddInteractiveWebAssemblyRenderMode ();
You can also enable rendering in a single Razor component using the :
@rendermode RenderMode.InteractiveWebAssembly
But also when instantiating the component, or the whole application (via the Router):
<MyComponent @rendermode="RenderMode.InteractiveWebAssembly" />
<Routes @rendermode="RenderMode.InteractiveWebAssembly" />
Pros
WASM’s major advantage is its ability to operate in disconnected mode. You get fully interactive components without the need to use server resources for your application. With these components running in the browser, you let your users take charge of the processing power.
Unlike server-side rendering, where WebSocket messages need time to get to the server and the result back to the client, here everything happens in the browser, so the user experience is much smoother.
Your components can also operate “offline” in this mode, as everything happens in the browser (although you do need a network connection to retrieve or update data on the server).
Cons
For some types of application, the large initial download of the .NET runtime and your application can be a challenge, as it delays the initial loading of a page.
As your application runs in the browser, you’ll need to set up an API to handle interactions with server resources.
4. Auto Rendering
Automatic rendering determines how the component is displayed at runtime. The component is initially displayed with interactive server-side rendering (interactive SSR) using the Blazor Server hosting model. The .NET WASM runtime and the entire application are downloaded to the client in the background and cached for use on subsequent visits.
This allows you to use Blazor Server’s fast initial load so that users don’t have to wait for WASM to load and initialize, while continuing to use WASM for most ongoing interactions (reducing your server load).
On the first call, the page is generated on the server (Server Rendering) and immediately sent to the client. At the same time, a process downloads all the .NET libraries (reduced). Then, each time the user clicks on the button, the WASM code present on the client is executed and the HTML result is updated. It is therefore possible to be offline and still have a functional application.
For Auto rendering to work, it must be activated via these commands:
builder.Services.AddRazorComponents()
                .AddInteractiveServerComponents()
                .AddInteractiveWebAssemblyComponents();
...
app.MapRazorComponents<App>()
   .AddInteractiveServerRenderMode()
   .AddInteractiveWebAssemblyRenderMode()
You can also enable rendering in a single Razor component using the :
@rendermode RenderMode.InteractiveAuto
But also when instantiating the component, or the whole application (via the Router):
<MyComponent @rendermode="RenderMode.InteractiveAuto" />
<Routes @rendermode="RenderMode.InteractiveAuto" />
Pros
The big advantage here is that you can avoid the challenge of making your users wait for Blazor WASM (using the server initially) while using WASM for most interactions afterwards.
The result is a much lighter load for your server and a faster user interface for your users.
Cons
Designing your components to run in multiple rendering modes is more complex. You’ll need to ensure that they can run on both the server and the client.
You’ll need to use a Web API between the component and your data to ensure that it can be run on the client. If you don’t want to use the Web API in server mode, you’ll need to create abstractions to handle the two different ways of interacting with your server’s resources.
5. Stream Rendering
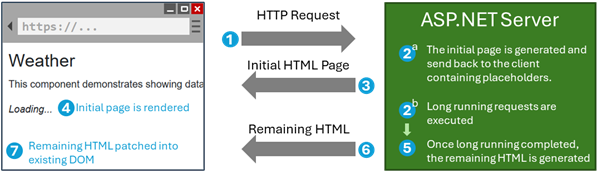
Streaming rendering allows you to distribute content updates over the response stream and improve the user experience for components that perform long-running, asynchronous tasks.
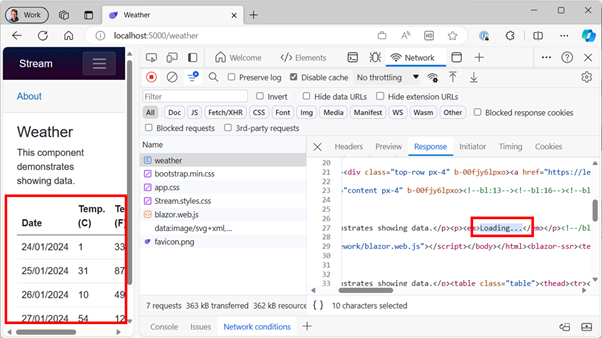
Let’s take the example of a component performing a database query. Normally, asynchronous tasks executed as part of the rendering of a server-side component must be completed before the rendered response is sent, which can delay page loading. To improve the user experience, Streaming rendering first renders the entire page quickly with dummy content while the asynchronous operations run. Once the operations are complete, the updated content is sent to the client over the same response connection and integrated into the DOM.
It is possible to activate Stream Rendering, in a Blazor project of type Static SSR or Interactive SSR, using the [StreamRendering] attribute (in addition to the _framework/blazor.web.js script which should already be present in your main page).
Pros
- Improved performance over SSR
- Always fast, whatever the page size
- Better management of backend multiprocessing
- Responsive websites even in difficult conditions
- Optimized referencing
Cons
- Caching is more difficult, but still possible
- Some models are difficult to integrate with streaming
Références
- https://learn.microsoft.com/en-us/aspnet/core/blazor/components/render-modes
- https://learn.microsoft.com/en-us/aspnet/core/blazor/components/rendering